

Hello! I'm James
I am a student at Chichester College, studying UAL Level 3 Extended Diploma in Creative Media Production & Technology.
I am passionate about media and producing content.
Welcome to my website for my Final Major Project (FMP).
“I confirm that the attached assessment is all my own work and does not include any work completed by anyone other than myself and sources have been appropriately referenced.”
- James Guy


James Guy
Student studying 'UAL Level 3 Extended Diploma in Creative Media Production and Technology'
Candidate Number:
4061289178
Email:
Studying at:
Chichester College
Date of Birth:
December 24th, 2002
CONTEXT & RESEARCH
HISTORY OF MUSIC VIDEOS TIMELINE

YOUTUBE RESEARCH INFOGRAPHIC

MUSIC VIDEO GENRES RESEARCH


NOTABLE DIRECTORS AND THEIR MUSIC VIDEOS
David Fincher, 58 years-old, is widely regarded as one of the greatest directors of films and music videos of all time, 'known for his psychological thrillers, his films have received 40 nominations at the Academy Awards, including three for him as Best Director. Born in Denver, Colorado, Fincher developed a passion for filmmaking at an early age.'
One of his most renowned quotes is that 'directing a movie is like three-dimensional chess, everybody has to peak at the same time', what he meant by this is that he sets out to create a shared sense of emotion amongst any group of people that watch his music videos or films. He expertly achieves this through writing and bringing to life unique and memorable visual screenplays, 'so that the images stay in the readers' minds for a long time'.


Fincher famously produced, Madonna - Express Yourself in 1989, the most expensive music video of its time. 'Madonna - Express Yourself' music video used a combination of dynamic medium and close-up shots to capture the emotions of Madonna, one of the revolutionary music artists when it comes to the progression of the music video industry. Furthermore, David Fincher included a dramatic strobe effect during the final crescendo of the hit single, adding a dance-style to the pop video and a greater sense of pace and rhythm.
Fincher intelligently uses camera movement to draw the viewer's attention to emotive focal points, and add an abstract sense of authenticity by mirroring the movement of actors on screen with smooth camera tilts and pans - this is something I will set out to replicate in my own work to help engage my target audience during studio scenes featuring the musicians.
Furthermore, a variety of abstract locations and sets are used throughout the 'Express Yourself' music video, paving the style to follow for many directors and artists during future creations, as it not only portrays Madonna's singing ability, but also her acting skills, building an engaging dramatic narrative to depict the romantic connotations of the song's lyrics, using a variety of cinematic conventions and match-cutting techniques.

Although they are two very different styles, the idea of building a narrative through the use of professional acting and choreographed dance scenes could be likened to the world-famous 'Michael Jackson - Thriller' music video directed by John Landis. Whereas, in this instance the high-level acting and lengthy plot-line was taken one step further and transformed the song into a groundbreaking theatrical short, considering its time of release in 1983.
Moreover, in juxtaposition to the reoccurring dramatised romantic themes found throughout the song 'Express Yourself', 'Thriller' created an almost tangible sense of horror and fear, through the inclusion of stunning make-up and video effects to create scenes of monsters and zombies performing dance routines within unnerving locations of cemeteries and forests at night.
Consequently, this once again proves the importance of locations and carrying out in-depth location recces before productions, as the areas used for filming can be vital in the overall messages and themes that the visuals convey; I will ensure my chosen shooting locations match my motifs and intentions which I will be exploring during the pre-production process of this final major project.

MUSIC VIDEO ANALYSIS (RELATING TO INITIAL IDEAS)
DESCRIBE THE IMAGERY.
The 'Yes and Amen - Chris McClarney' performance video is filmed within a warmly lit, wooden panelled music studio. A combination of slow roaming and stabilized wide shots, alongside handheld close-ups of the singers and their instruments, culminates in producing slow, stylish visuals.
HOW DOES IT FIT WITH THE TRACK?
The slow tempo strumming of the guitar mirrors the amiable imagery, charming the audience to relax and focus on the raw and meaningful vocals of the track. The opening of the performance video includes an array of wide shots to help establish the scene and set the tone. Furthermore, during the most passionate segments of singing, close-ups of Chris McClarney are used to capture his emotions and allow the audience to empathise with him in those spiritual moments, building a deeper connection with the song. Additionally, the shots of the guitars help create a greater sense of authenticity between the visuals and the audio.
HOW COULD IT HAVE BEEN MADE?
This particular performance video does not use any noticeable video effects, colour correction may have been implemented to enhance the warm glows from the retro studio lighting, but one would assume the visuals are largely raw and authentic. This is made possible through a variety of professional filming equipment, allowing cameras to roam smoothly on a range of mounts and record very high-quality, dynamic footage from a multitude of angles. The editing process would have been mainly focused around picking the best shots for specific moments of the song, and ensuring the cuts between them felt smooth and seamless, to create the intended relaxing interpretation that the audience gratefully indulge in.
HOW COULD YOU USE THIS APPROACH TO DEVELOP YOUR OWN IDEAS?
I will aim to use a plethora of the aforementioned techniques in my own work. The wide roaming camera shots of the studio and close-ups of the instruments and singers, using a fusion of handheld and fixated visuals have really inspired me with many ideas for my own work. I look forward to planning my production with these approaches in mind, and I believe the amalgamation of premium studio footage, with reflective outdoor landscapes and scenery will unite to produce an attractive and purposeful final product.
This particular music video has been my favourite to research and study for a number of reasons of which I will delve into shortly. 'I Need A Ghost' was written by Brandon Lake, Dante Bowe, Sean Curran and Joshua Silverberg - the video was recorded for Brandon Lake's live album, House of Miracles. The live performance video was published on YouTube on the 23rd February 2021 and has already racked up over 66,000 views, with the official music video version generating almost 800,000 views prior to this release.
I have chosen to analyse this particular music video as it uses modern editing styles and cutting techniques that I would I love to include in my own work as I believe it makes the video very engaging and would be appealing to not only my target audience of young Christians but also to non-Christians as well, simply due to the up-beat, inspiring nature of the track and video.
Furthermore, the large range of camera angles, and the free-hand stabilized equipment allowed the camera operators to circulate the stage and get close to the instruments, vocalists and crowd, harnessing the energy of the live performance. The editors utilised the footage brilliantly, for example, cropped video overlays of different shots of the live performance are symmetrically arranged, cutting into view in time with the music and framing the best shots on screen through the use of strobe-like colour correction and flashing transitional effects.
An observation of mine was that more of the video effects were used during the chorus, allowing for a gradual increase in the pace of the cuts and lighting effects beforehand, which provided a really exciting journey and a sense of narrative before reaching the crescendo of the song; I will take inspiration from this when editing my own music video as I believe this technique will appeal greatly to my target audience of 16-25-year-old Christians.


The live version of 'I Need A Ghost' intelligently mixes the sound of the worshipping and singing-along of the live crowd at the performance with the audio recordings of the musicians to produce a phenomenally composed soundtrack, allowing viewers to feel the powerful energy from the venue as well as the high-quality audio recording of the talented artists on stage - providing a greater sense of authenticity and realism to the video.
The lead singer Brandon Lake wrote in the comments of the official music video version of this single, "Some context for the song you’re about to hear. The song is about THE Holy Ghost because there’s only one Holy Ghost. The song is a personal one written from a place in the past realizing I needed something more than the world can offer. And realizing it’s the power and the relationship of the Holy Spirit." In essence, the song is more than just an inspiring track, it has a really powerful Christian message behind it and he aims to impact the lives of everyone that hears the song through the meaningful lyrics that it includes. This is being achieved not only through publishing the song on the popular media-sharing platforms of YouTube, Spotify, iTunes, etc, but also through advertising it on other social media's such as Instagram and Facebook, encouraging their target audience to give it a watch/listen. I can take notes from this when publishing my own final product - cross-platform marketing is a really effective way to maximise viewing figures and ensuring that as many of your target audience are aware of the music video's release as possible.
TARGET AUDIENCE RESEARCH

I conducted a short audience poll which was answered by 10 members of my target audience: 16 - 25-year-old Christians, to help me establish a clearer idea of which style of music video would be most popular.
Although the data is based on a very limited number of audience members, I believe I was still able to reach some valuable conclusions. For example, I would like my video to be mainly performance-based, but also to include thematic landscape and cinematic elements, which conveniently was reflected in the views of my target audience, with the highest votes of the first poll being for performance videos, followed by thematic.
However, the second poll's results have had more of an impact on my plans; during my research I really enjoyed the upbeat atmosphere created in the song, 'I Need A Ghost - Brandon Lake, feat. Dante Bowe', and three voters agreed with me in enjoying this style of upbeat music the most, however the majority conveyed their preference to be a more calming and reflective style product. After spending time considering my options and evaluating what is available to me during these limiting times, I have decided a reflective video would be more achievable regardless, as this will be safer resulting in me working with less people. This is due to the fact that I will be filming landscapes and scenery to go alongside footage of my church band who are regularly covid tested for the calming/reflective video, as opposed to groups of friends which I had previously envisioned when mentally planning for an upbeat video. Furthermore, I will still be able to use editing styles inspired by my research, however I will to slow the pace of cuts and visual effects to compliment the relaxing music.
The results from the third poll were largely inconclusive, due to the small number of audience members voting on the poll I thought it seemed unreasonable for me to choose the genre of my music video based around a poll that won by just one voter, so I have decided the genre of 'Jesus Music' to be most fitting to the visual styles I am aspiring to achieve, although this may all be subject to change depending on the style of song that my church band decide to play on the day of filming.
MY TARGET AUDIENCE
After carrying out a short but very relevant audience questionnaire, and researching similar media products, I have come to a clear conclusion of who my final product is tailored towards. Demographically, my target audience is 16-25-year-old Christians of all genders and financial positions, who mainly enjoy reflective performance music during worship. Moreover, the visuals in my music video will feature locations on the south coast of England, so I will be mainly attracting the target audience who abide in this region. Furthermore, regarding psychographics, they will all share similar interests through following the same religion, meaning they will have largely the same Christian attitudes, and will enjoy worship and evangelism.
REFERENCES
HighsNobiety (2017) Sophie Atkinson - A COMPLETE BREAKDOWN OF THE HISTORY OF MUSIC VIDEOS
slideshare (2014) meganlsx - Music videos timeline
Bethel Music (23 Feb 2021) I Need A Ghost - Brandon Lake, feat. Dante Bowe | House of Miracles (Live)
MultiTracks.com Sessions (5 Nov 2018) Yes and Amen - Chris McClarney
Meghan Trainor (19 Nov 2014) Lips Are Movin (Official Music Video)
Taylor Swift (16 Jun 2009) You Belong With Me
Songfacts (2008) You Belong With Me by Taylor Swift
Stormzy (21 Jun 2019) CROWN (OFFICIAL PERFORMANCE VIDEO)
Influencer Marketing Hub (12 Jan 2021) 20 of the Most Viewed YouTube Videos of all Time [Updated Daily]
Bethel Music (3 Feb 2015) Ever Be (LIVE) - kalley | We Will Not Be Shaken
Redeemer (28 Mar 2021) Church Online
CreativeRyan (2017) Apply EFFECTS To ALL Video Clips | Adobe Premiere Pro Tutorial
Easy Motion (2017) Adobe Premiere Pro CC Quick and easy Tutorial : how to make SPLIT SCREENS
Vegard The Filmmaker (2017) How to add cinematic black bars to videos in premiere pro cc
Cinecom.net (2019) 5 EASY Things you can do in AFTER EFFECTS
Outstanding Screenplays (2020) David Fincher Mank Interview - 10 Tips for Screenwriters & Filmmakers - Behind the scenes Commentary
Madonna (2009) Madonna - Express Yourself [Official Music Video]
David Fincher (Wikipedia)
Michael Jackon (2009) Michael Jackson - Thriller (Official Video)
PLANNING & PRODUCTION
MUSIC VIDEO INITIAL IDEAS MIND-MAP


MY MUSIC VIDEO PITCH
LOCATION RECCE

SHOT LIST

PREVISUALISATION OF GRAPHICAL ELEMENTS
After being inspired by the incorporation of cropped video overlays within the existing music video of 'I Need A Ghost' by Brandon Lake Ft. Dante Bowe, I have created a set of templates which I will be able to follow within the post-production editing process in Adobe Premiere Pro & After Effects. I am aiming to harness this editing style in order to combine my studio and outdoor footage in a dynamic and visually engaging way. The planning below has enabled me to clearly visualise my final product and understand the type of shots I require when filming, and should later save time during editing.


For this first set of overlay styles, I will use a very short fade transition to introduce the three portrait Redeemer studio overlays one-by-one, filling the screen and hence transitioning away from the previous outdoor scene.


Here are four other overlay arrangements I will be including in my final product. These will further my freedom to display multiple angles simultaneously in a creative and attractive way.


Similarly to my first set of previsualised graphical elements, the replacing overlays will cut in one by one, however, I will most likely be using push transitions for this horizontal style, as this will be used during the upbeat chorus, and I will want to build a sense of pace to match the rhythm of the track.
PRACTICAL SKILLS
FILMING & EDITING MY PITCH


During the production and post-production editing of my pitch I used a variety of creative processes in order to inform my audience of exactly the product I am intending to develop in an exciting and persuasive manner.
I mounted a camera on a tripod to hold it in place of a medium shot in order to capture myself and the blue screen; I set the camera to auto-focus to ensure both the blue screen and myself as the presenter was recorded in full clarity, aiding the editing process. Personally, I believe the inclusion of the blue screen enhanced my presentation, by allowing me to edit and manipulate the way my PowerPoint presentation was displayed during post-production, as well as the addition of clips from existing music videos.
Moreover, I utilized the software of Vegas Pro 13 due to filming and editing the pitch from home and not currently having access to Adobe products, however, I still believe I was able to effectively build an imposing pitch through the use of the video effect of Sony Chroma Keyer to enable me to use the blue screen. I struggled to use the video effect to a high standard at first as I was using the default settings, however once I found the colour picker tool meaning I could match it exactly to the shade of the blue screen, and isolated the screen by showing the mask only, I was able to discover the best threshold levels to maximise the quality. Furthermore, I realised that the edges of the screen appeared very sharp and displayed too much noise, to solve this issue, I feathered the edges of the screen to create a smoother finish, adding a greater sense of professionalism to my work.


Also, I used the Pan & Crop tool to great effect especially during the opening segment where I conveyed a timeline of the history of music videos.
This allowed me to implement keyframes at the correct time to enable me to smoothly pan and zoom to the corresponding stage of the timeline in response to my narration, creating a greater sense of interactivity to my pitch, and capturing the audience's attention from the outset.

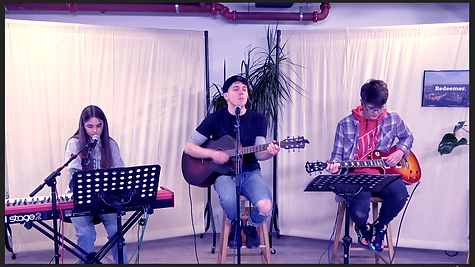
FILMING AT REDEEMER WORTHING
On Wednesday 14th April, I heavily assisted in the set-up of a range of cameras and lighting equipment at Redeemer Worthing's new studio where they will be filming their weekly online Church services. Above is a short behind the scenes video displaying the work that was put in to ensure the equipment and musicians were ready to record the songs.
My knowledge and creative eye for camera shots was put to the test as I configured close-ups, medium shots and a wide shot to cover all the musicians and their instruments in a visually pleasing way for the target audience.
I got to grips with the vision mixer screen to preview the full range of camera shots and make sure that they were appearing correctly on the live feed.
Furthermore, there was a variety of large stands and tripods for the main cameras and lighting equipment which I learnt to operate during the set-up and set-down of the shoot; this will be really beneficial to me during future productions in my career.


OUTDOOR FILMING SESSIONS
I have taken my camera and tripod to three different outdoor filming locations, in order to capture the dynamic and atmospheric visuals I need for my intended music video plan. This was really successful, and I believe I once again furthered my camera operating skills and improved my eye for picking out attractive camera shots, whether it be through close-ups of plants and wildlife or extreme wide shots from the hillside.
Moreover, at the beginning of this final major project I set myself a goal to finally learn how to use manual focus, as this was something that we had little opportunity to do, due to the lockdown restrictions. After watching a number of tutorials specific to the camera I loaned from the college, I became adept at using the focus reel to perform focus pulls, successfully adding a higher level of professionalism to some of my shots.


ADOBE PREMIERE PRO EDITING SESSIONS
Early during my first editing session in Adobe Premiere Pro for my final major project outcome, upon trying to apply colour balance to a video track in hoping that the effect's settings would alter all of the clips on that particular track, I quickly came to realise that this is not a feature of this software, which led me to carry out online research on YouTube. Thanks to CreativeRyan's tutorial, I became aware about the application of adjustment layers within projects, and how these can be used to apply effects to all video clips. This enabled me to adjust the different camera's levels of warmth and exposure, so that they were all visually at the same level, creating a sense of cohesion between the different angles I filmed at the Redeemer studio in Worthing.


CreativeRyan (2017) Apply EFFECTS To ALL Video Clips | Adobe Premiere Pro Tutorial

Following on from this, I dragged in a second adjustment layer above all video tracks, to allow me to adjust the colouring of all the camera angels simultaneously, in order to create the blue filter which I said I was aiming for in my pre-production planning.
A combination of different levels of shadows, midtones and highlights allowed me to produce a visually appealing blue tone, along with the increase of contrast to improving the vividity of the colours, contributing greatly to the overall atmosphere of my video.
.png)
Continuing on, I spent the rest of the day editing to complete a first, simple render of my music video, including the studio footage alone and with only the aforementioned video effects.
I split up the different camera angles across several video tracks, after using the video preview tool to mark 'in and out' these key moments and drag them into the timeline, which allowed me to pick the best moments to include in the final video.
.png)
FIRST BASIC RENDER (STUDIO FOOTAGE ONLY)

Easy Motion (2017) Adobe Premiere Pro CC Quick and easy Tutorial : how to make SPLIT SCREENS
When originally trying to create split screens, I was unsure how to crop the videos, and could only see the settings for scale and positioning. This was because I was unaware of the 'Crop' video effect, which I found through the adjacent YouTube tutorial. Since then, I have been able to produce a variety of dynamic overlay sections within my music video, through positioning, scaling and cropping shots to match my previsualised graphics plans. This has been a really effective way to creatively display multiple angles and shots simultaneously and add a clean, modernised style to my video, appealing to my upcoming target audience of 16-25-year-olds. It has also been a fitting way to merge the outdoor scenes with the studio footage.


Throughout my editing process on Adobe Premiere Pro, the 'Warp Stabilizer' tool has been a very important video effect.
This is due to the fact that a large proportion of my outdoor scenery footage was recorded handheld, which led to it being fairly shaky upon review.
However, after experimenting with the different variables the effect offers, such as the option to stabilise through altering the position, scale and rotation, or through using the subspace warp, I was able to appropriately adjust it according to the style of each shot.
I found that the shakier clips appeared too distorted when using the subspace warp, meaning the position, scale, rotation was a better option for the most unsteady footage.
Additionally, I changed the 'Result' setting to 'No Motion' for the shots that I wanted to appear completely still, and alternatively, I applied the 'Smooth Motion' setting for walking shots and slow panning movements, creating a very smooth result which I am really pleased with.


I found my two shots of horses required different colour correction settings than the rest of my footage, due to the fact that it was very brightly lit and the greens from the grass were extremely vibrant, clashing with the blue midtones/highlights settings of my adjustment layer. In order to fix this issue, I applied a range of lumetri colour settings specifically for these shots, reducing the temperature and whites, followed by increasing the blacks and adding a subtle blue shadow tint was a great starting point. However, in order to accurately colour grade these shots to correspond with the rest of my video, I used curves to lower the greens and blues, making the shots appear less harsh, blending this opening section of the video very effectively.

As I began nearing the end of my edit on Adobe Premiere Pro, I felt as though my music video lacked that extra cinematic feeling through the use of black bars across the top and bottom of screen, a stereotypical feature of many of today's music videos. I believe this applies a greater attraction to the main focal points of each shot for the viewer, and gives the playback of the music video a cinema-type feeling when watched in full screen.
In order to understand how to achieve this simple yet stylish affect, I quickly researched for a YouTube tutorial, and thanks to Vegard The Filmmaker, I was able to easily drag in an adjustment layer above all my video tracks and add and adjust the crop effect to enable me to create the two horizontal black bars at the top and bottom of my entire video.
Vegard The Filmmaker (2017) How to add cinematic black bars to videos in premiere pro cc
ADOBE PREMIERE PRO SECOND RENDER
After several checks I have rendered a second version of the music video, ready to add some finishing touches in Adobe After Effects. I am deeply satisfied with the progression I have made since my first render which only included the studio shots; I believe I creatively used the software to build a range of transitions and cropping/overlaying techniques to effectively intergrate the outdoor imagery, whilst maintaining the calming and reflective styles that my target audience favour, based on my primary research. The final editing timeline can be seen below:

ADOBE AFTER EFFECTS EDITING SESSIONS

Cinecom.net (2019) 5 EASY Things you can do in AFTER EFFECTS


As a result of my lack of past experience using Adobe After Effects, I thought the best way to begin would be to watch a YouTube tutorial, displaying some of the basic effects that you can add to your videos, to spark some ideas for my own work. One of my favourite effects that I came across in the video was 'CC Light Rays'.
This allows you to centre a point to brighten on the screen and causes rays of light to shine from that central area. I used keyframes to raise and lower the intensity in order to add the effect at two different intervals within my video - the first being during the opening shot of the studio lighting, and the second was to highlight the cross which I filmed at West Wittering beach, this shape is of course a very key symbol of the Christian faith, so it made sense for me to add a highlight point, due to the overall themes of my music video.

Furthermore, I implemented the motion tile effect, and through mirroring the edges, I was able to expand the shot of the wind turbines on the horizon taken from the top of Highdown Hill, this allowed me to create more room to manoeuvre an exciting zoom transition from the previous shot. After this, I set keyframes to alter the output width and height to create the zoom effect; the outcome was very successful and provided an extra level of visual interest to this section of my video, appealing to my young and active target audience of 16-25-year-olds.
Following on, I decided to experiment with motion tracking to enhance a follow shot of a dog running along the beach. I used a multitude keyframes to ensure that the track point was on the dog throughout the shot, this allows you to feel the speed the dog was moving at through the fast panning effect the motion tracking culminated to produce, which complimeneted the song brilliantly, as it reached its crescendo.

The final timeline from Adobe After Effects editing project can be seen above. Although the majority of my video effects were built within Adobe Premiere Pro, due to the calming and reflective style of my video I was seeking to achieve, and being more confident in the use of Premiere as a software, I still believe I made great improvements to my overall understanding of After Effects. This was made possible through understanding the process behind adding a variety of exciting video effects, involving the manipulation of keyframes, splitting tracks and altering the individual video effects setting before rendering my final product, which can be found in the 'Presentation' section of my website.
EVALUATION & REFLECTION
SWOT ANALYSIS


SWOT REFLECTION
After reviewing my strengths and weaknesses in creative media and analysing the opportunities and threats of all of the choices of FMP projects, I believe I have a much clearer picture of the path I would like to take. I found the visual format of the tables really useful in building an overall understanding of my skillset, and I came to understand that I produce my best work through filming and video editing, particularly in Adobe Premiere Pro, as displayed through previous units.
A music video, short film or short documentary would allow me to utilise these abilities and produce a final product to the best of my ability. On the other hand, there are upsides to the cross media marketing campaign for a new film or magazine, as they would allow me to explore the world of marketing and improve my skills in more graphics based software such as Adobe InDesign and Photoshop.
PERSONAL SKILLS AUDIT
During my time on the course, I have developed many new theoretical skills such as research, planning, analysis and evaluative techniques. I have also greatly improved my organisation and project management, ensuring I am able to produce my best work and meet deadlines. Furthermore, I have had time to develop my practical skills through learning new software and using high-level filming equipment. Additionally, I have been able to develop my social and communication skills - I have worked in small groups, where we have had to combine each other's ideas and specialisms, to make the best individual final product possible for each student. Consequently, these improved aspects mean I am more prepared to enter the media industry or higher education courses, providing great benefit to my future career path.
Within the first year of creative media, I furthered my specialism of video editing, particularly when I made my own ‘Fashion Lookbook’. I really enjoyed learning new filming conventions and implementing a variety of video effects and dynamic transitions during post-production in Adobe Premiere Pro, to target the active audience of 16-18-year-olds. I believe the final product was arguably one of my best pieces of work from the course. However, I was also very satisfied with the outcome of the Sound & Foley Project, where I made a new soundtrack for an animation, using Adobe Audition, for the first time. I believe I made huge progress and built a good understanding of the software as a whole, allowing me to experiment with a variety of sound effects including pitch, tempo, echo and equalization to produce a final product I was really proud of.
An area I felt less confident in, especially in the first year, was Adobe Photoshop. Before the start of the course, I had very little experience using the software, meaning I have had to spend time watching tutorials and learning the tools available to help me to produce eye-catching final products, such as magazine spreads and poster campaigns.
I started the second year by producing a short documentary in Unit 9, “The Suspension of Grassroots Sports” which focused mainly on the impact lockdown has had on grassroots football. I believe I really progressed during this unit; I researched and expanded my knowledge on the features of different documentary genres and modes. Following this, I chose to tailor my production to expository mode; using relevant visuals of grassroots sports locations to support the points being made by my voice-over. Additionally, I was able to make new connections with Worthing FC, my primary filming location, who have invited me to work on their media team after lockdown. Furthermore, this project helped expand my video editing skills by using Sony Vegas Pro 13, as this was the only software I had available to me at the time, as a result of college closures. I believe I used the tools it provided effectively to produce a high-quality final product.
Upon review of my progression to this pivotal point in the course, it has become clear to me that video editing is my strong point, and is the path I would like to go down, not only during my final major project, but also in my future career. The majority of my best work has been created in Adobe Premiere Pro; I feel like it really suits me as someone who is passionate about creating content. I have greatly progressed in the usage of this software over the two years and I hope to take this further during my final project by improving my skills in more high-level areas such as colour grading, camera tracking and masking. However, I am still very inexperienced in Adobe After Effects, so I look forward to being able to learn and experiment with this software further when we return to college, adding more advanced visual graphics to my work produced in Adobe Premiere Pro. Additionally, I would like to progress in Adobe Photoshop, as this is one of my weaker areas. This will be achievable through creating exciting plans during pre-production to help me visualise my final product. Furthermore, it will be great to spend more time with valuable camera equipment, when we are able to hire equipment from the college. I will be looking to develop my filming techniques through implementing manual focus and experimenting with aperture, for example, to produce striking visuals.
The skills and knowledge that I have previously mentioned which I have gained from my time on the course will be really useful when developing products within my final major project. Moreover, the theoretical side of my media work has greatly improved throughout the course, and I look forward to implementing the correct media terminology and taking my research and analysis to the next level, to set myself up for a successful production.
I believe my main practical abilities of camerawork and the creation of content in Adobe Premiere Pro will come to their fullest fruition if I decide to carry out a music video for my final major project; a genre of media that I am greatly interested in.
Consequently, this will allow me to maximise my focus on cinematography and video editing, as opposed to the idea of a cross-media marketing campaign for a new film or magazine, for example, which surrounds my weaker areas of photography and graphics-based editing. In contrast, I will be able to continue to develop my camerawork and video editing ability, by spending more time using high-level filming equipment and researching Adobe Premiere Pro and After Effects, in order to learn and reflect on new processes and effects, to make my final product the best it can be. The short documentary option was also of interest to me, however, as I have already produced one within the second year of the course, it seems logical to demonstrate a wider skillset by delving into the exciting and visually stimulating genre of music videos.
PERSONAL SKILLS AUDIT REFLECTION
The first part of the final major project has been of real benefit to me in understanding my overall capabilities as a media student. After spending time reviewing the various projects and assignments which I have worked hard on throughout my time on the course, I was able to establish my strengths and weaknesses in a number of subject areas. I discovered the main recurring themes to be that filming and video editing was a strong point, displayed through my fashion lookbook in year one and my short sports documentary in year two, whereas photographic editing/graphic design and sound recording was an area for personal improvement.
Furthermore, the personal skills audit enabled me to pinpoint the software which I am most adept in - Adobe Premiere Pro - I made a short list of advanced editing styles and techniques I wish to implement into my final project, accomplishable through delving into online tutorials and experimenting at leisure, 3D camera tracking would be an appropriate example. Moreover, I came to understand that amelioration of my basic Adobe After Effects skills, would allow me to produce a higher-level creative outcome.
Ultimately, this led me down the path of deciding to create a music video, allowing me to begin developing initial ideas through a variety of visual and written plans.
HISTORY OF MUSIC VIDEOS TIMELINE REFLECTION
After spending time studying various sources I was able to find out more about the surrounding history and development of music videos since their first form of appearance in 1926. It was interesting to see how this genre of media has evolved through the creation of different television shows and online platforms, most significantly, MTV and YouTube.
Furthermore, it was eye-opening to see the ground-breaking music videos of Bohemian Rhapsody by Queen and Thriller by Michael Jackson; it was clear to see the huge impact they had on the industry's future. Queen showcased brilliant special effects for its time, alongside stunning visuals for their performance video which has since racked up over a billion views on YouTube. Whereas, Michael Jacksons' financially record-breaking productions helped produce an encapsulating 13-minute Hollywood directed narrative, both of which displayed qualities that will inspire me during the planning of my own music video.
As a result, this has been a really beneficial research task which has helped build a base of knowledge so that I can now focus more closely on popular music videos that have released on YouTube in recent years, expanding my understanding of the techniques used further.
YOUTUBE RESEARCH INFOGRAPHIC REFLECTION
This was a really enjoyable and creative task, I believe I furthered my Adobe Photoshop skills through experimenting with many different font settings and styles, as well as transparency and opacity effects, to produce a silky finish to this piece of work. Additionally, I was pleased with the extra stylisations I incorporated into the header section, using hand drawn lines and glow effects to introduce the infographic. Moreover, researching into the most popular music videos on YouTube enabled me to see the techniques used to make these music videos so successful - the eye-catching, vibrant visuals and dynamic camera movement and video effects were really inspiring and I will definitely take influence from these videos when it comes to planning my own work around my target audience.
MUSIC VIDEO GENRE RESEARCH REFLECTION
The music video task surrounding the different styles and genres of this specific form of media has been really useful for me in learning ways to pinpoint the techniques used within them. After analysing three popular songs, I now have a good overall understanding of the features of performance, narrative and thematic music videos. This will be very beneficial when it comes to planning and filming for my own work, as I will now be able to visualize my idea around a specific genre, and may even take inspiration from Stormzy's music video for his song 'Crown', as I am leaning towards the idea of a performance video myself; I was really impressed by the naturalistic set, lighting and one singular dynamic camera shot that was used.
MUSIC VIDEO INITIAL IDEAS MIND-MAP REFLECTION
Although the mind-map may not appear to be the most organised way of collecting my thoughts and ideas, it was a really useful way of brainstorming and allowed me to come up with three individual music videos I could choose from for my FMP: a pop, rap or worship video.
Each had their own unique qualities, for example for the pop video I developed an exciting narrative surrounding the theme of 'rags to riches' which I could develop further. Moreover, for the rap video I have a lot of experience in viewing these types of music videos in my spare time, so I understand the features and visual styles that I could implement and experiment with to make an exciting final product.
However, I have made the decision to go down the route of the worship music video, as I have great contacts with members of my church band, and this option will enable me to produce the highest quality final product out of the three, through filming at the band's studio. Additionally, during my research I became much more interested in performance videos and the dynamic filming techniques used within them. I am really looking forward to delving into this genre further, and adding my own personal twist on it through integrating thematic landscape visuals by travelling to a variety of outdoor filming locations, to compliment the indoor footage I will record of the church band.
Following on from this mind-map, I will now be researching into worship music performance videos for inspiration and discovering appropriate techniques that I can involve and adapt to fit into my own work; this will be really useful when it comes to building finalised visual and written plans for production.
MUSIC VIDEO ANALYSIS (RELATING TO INITIAL IDEAS) REFLECTION
Having spent time studying two different styles of music videos relating to my own intended final product of a Christian worship music video, I have been able to effectively pinpoint the styles and techniques from both which I would like to incorporate into my own work. For example, from the first video, 'Yes and Amen - Chris McClarney' I was able to see the simplistic yet professional filming techniques of slow roaming wide shots, accompanied with close-ups of the musician’s instruments and faces to capture the emotion of the track, all of which I would like to incorporate into my own work when filming my church band. Moreover, I was more interested in the post-production editing styles of 'I Need A Ghost', and would love to experiment further with the aforementioned cropped overlays, helping to build captivating visuals for the viewer. I believe the combination of similar filming and editing techniques to these would culminate in a brilliant final product, proving my research to be of great benefit to me, as I now have a clearer idea of what I want to achieve - exciting!
TARGET AUDIENCE POLLS REFLECTION
On the whole, despite the small pool of voters, this has been a largely successful primary research method to help me to begin to define a more specific audience profile which I will be targeting through my final product. The polls gave me a clearer picture of this - I now know that my target audience of 16-25-year-old Christians mainly enjoy reflective performance music, which aligns suitably to the genre of my church band, helping me to begin my planning of my production. I will now conduct more secondary research to help me understand my target audience further.
TASK 2 OVERALL REFLECTION
Task 2 has been an overall a very beneficial couple of weeks which has firstly enabled me to understand the history and origins of music videos and analyse successful performative, narrative and thematic videos, giving me a clear insight into what each style involves and numerous inspirations for my own work.
Additionally, I came up with some initial ideas through mind-mapping, which lead me down a straighter path where I could specifically analyse Christian music videos in more detail; I was able to pinpoint my favourite features and techniques used in Chris McClarney and Brandon Lake's popular videos, which will directly influence my own work for the better.
Furthermore, I improved my Adobe Photoshop skills through producing a visually creative infographic, portraying the most popular music videos on YouTube, this allowed me to continue to build confidence using layering and blending options.
My target audience research has made my product intentions transparent, despite limited primary research due to being restricted to simply online methods of communication during the current circumstances of the pandemic, I was able to draw valuable conclusions and learn more about who I am aiming my product towards, allowing me to come up with a definitive audience definition. All of these tasks culminate in a seamless transition to task 3 where I will be using these decisions to form my product proposal.
PITCH REFLECTION
Today I filmed and edited my pitch to showcase my idea for my final product in a persuasive manner. I believe I conveyed articulate methods of explanation in order to achieve this, and the use of the blue screen used to display my presentation has been really effective, which I will discuss further in my practical skills. I came across some difficulties in presenting my work and found the concept of speaking to the camera a little daunting, but after a few run throughs of the main important points that I needed to cover, I was able to expand on them effectively during filming to perform a pitch that I am proud of. Furthermore, it has given me the chance to lay out a clear plan and develop a creative vision to carry out during my filming and editing process, which has put me in a really good place to start my pre-production work.
PRE-PRODUCTION REFLECTION
Due to the deadline being brought forward for the final major project, we were instructed to condense the amount of pre-production work that we carried out, due to already demonstrating these skills in other units. However, I still ensured that the work that I did complete was very thorough and provided a genuine benefit to the planning and development of my project, for example I have put together a detailed project action plan to ensure I complete the relevant work each week to the best of my ability.
In addition to this, I spent a lot of time building an extensive shot list to cover the vast majority of my music video, this could be subject to minor changes as I do not know the exact duration of the song that the band will play on the day of filming. However, after creating two or three versions due to developing new ideas throughout the week, my final shot list conveys rigorous description of the visuals I want to achieve at each stage of the music video, meaning I am now ready to film and I feel confident that I will be able to achieve my intentions. Furthermore, I have created a set of graphics to visually convey my plans for the overlay editing style which I will be implementing into my video, I had to make some changes to a few of them to ensure that they corresponded with my shot list, but it was another really benefitial method of planning for me personally, as I struggle with free-hand drawings. Lastly, I conducted a location recce for my church band's studio which will be very helpful for when I arrive at my scheduled film shoot next Wednesday.
FIRST EDITING SESSION & RENDER REFLECTION
Today I began editing together the different camera angles which I captured during filming at Redeemer's studio. After refreshing my basic knowledge through online research into the use of adjustment layers, I found Adobe Premiere Pro to be a really intuitive piece of software where I will be editing the majority of my music video. I believe I discussed the problems I encountered and the first video effects I have implemented in a clear and constructive format within the 'Practical Skills' section of my website, and I will strive to continue to keep up this level of documentation as the editing process develops.
Reflecting on the first render as whole, despite it being a simple first draft I was pleased with the professional impression that it displayed, which I believe will target my audience of 16-25 year olds, who will expect a high quality of media due to being surrounded by this in their technology heavy, day-to-day lives. This was largely due to the high-level camera equipment which I was able to source through the college and my Church studio, however I believe I have already displayed good signs in editing through the succinct cuts between angles at relevant moments; not all the cuts were perfect and some felt a little clunky, however this is something that will be improved in successive rendered versions, and through the incorporation of the previsualised graphical elements which I spent a lot of time devising during pre-production.
Pressing forward, I intend to advance the editing techniques conveyed, through the completion of my next render; encompassing outdoor footage and a variety of dynamic transitions and graphical elements, partially thanks to the involvement of Adobe After Effect's capabilities.
PREMIERE PRO REFLECTION
Before I started today's editing session, I set out a clear goal for myself to begin integrating my outdoor scenery footage into my studio band footage, through the use of a range of video effects and transitions, mainly through using the crop tool to build dynamic overlays, and a variety of dissolve transitions, such as 'film dissolve' and 'non-additive dissolve'. I was satisfied with the progress I made and have begun blending in the outdoor shots using the aforementioned creative methods.
However, I was not able to complete as much of the edit as I wanted to today, as I found adding effects such as the 'Warp Stabilizer' to be quite time consuming. This was due to the fact that you have to re-analyse the frames every time you change the duration of the clip used, which I did fairly frequently when making minor adjustments, although I am very much on track when referring to my production schedule, meaning applying these effects will pay off in the long run when it comes to revealing my final product.
Additionally, lining up the crop, scaling and positioning tools when creating the different overlays is not a quick task either, but I am really happy that my previsualised graphical elements plans are shaping up to the high standard I was aiming for in pre-production.
I look forward to continue editing in Premiere Pro until I am satisfied with a final render from this software, before moving to Adobe After Effects to add some finishing touches, such as the paint brush animation tool, to help target my audience of 16–25-year-olds through the use of further graphical techniques.
AFTER EFFECTS REFLECTION
I made great progress in my overall understanding of Adobe After Effects during my time spent editing the final version of my music video today.
This was made possible through learning new basic tips and shortcuts from online research such as how to split up clips across multiple tracks as well as how to view all keyframes simultaneously. As a result of understanding the basic premise of the software, I was then able to further my skills by implementing a variety of video effects including CC Light Rays, Motion Tile and Motion Tracker.
I believe the video effects I added benefit my final product greatly in keeping my young and active target audience of 16-25-year-olds engaged throughout the entire viewing of my music video, whilst aligning smoothly with the calming and reflective styles that they favour and that I have already created during my time spent editing on Adobe Premiere Pro.
FINAL EVALUATION
From the very beginning of my final major project, I knew I wanted the end product to be in the form of a video, due to my previous experiences creating visual content and using the industry-level Adobe software. Nevertheless, I took the time to evaluate every creative outcome available to me; by breaking down my strengths, weaknesses, opportunities and threats of each one into tables, I was able to come to an effective conclusion that producing a music video for my final major project would be the best route to take, demonstrated through my personal skills audit.
Continuing on, it was important that I understood the history and context behind music videos to visualise how they have evolved as a form of media, inspiring me with techniques to use in my own work along the way. I found producing a detailed timeline to be a worthwhile task in doing just that, and following on from this I created a stylish infographic of the most popular music videos on YouTube, hence broadening my Adobe Photoshop skills and building a greater understanding of what makes a successful music video.
Additionally, I expanded my account of theoretical knowledge of this subject area, through learning the meaning behind the terms, ‘performance’, ‘narrative’ and ‘thematic’ to label different styles of music videos. I proceeded to analyse an existing music video that fell under each category, helping me to evaluate the main features of the different styles, aiding the creation of my own plans when it came to building a mind-map of my initial ideas. After constructively brainstorming a variety of concepts, one that particularly stood out to me was the worship music video, as this is something that I am deeply passionate about and could expand on to achieve a high-quality final product. As a result, I analysed further music videos specific to this genre, which provided me with a range of inspiring filming and editing styles encompassing dynamic video effects and transitions, which would be appreciated by my target audience, acting as a form of secondary research as I approached this stage of the project.
I decided to target the demographic of 16-25-year-olds, who could be psychographically grouped through sharing the same foundational attitudes and beliefs surrounding Christianity. In order to ensure I knew exactly how to do this, I carried out additional primary research through creating a set of online polls to ask the members of this audience questions about their music video preferences directly. Although the pool of results was fairly limited, I was still able to draw valuable inferences from the data I received, and I reached the decision that producing a calming and reflective style performance video with ‘Jesus Music’ being the chosen genre of song, would be the most effective way to engage my audience whilst harnessing my abilities and ideas.
Moreover, I now had all the relevant information required to complete a finalised rationale, project concept and discuss my evaluative techniques that I would use to display ongoing reflection. This was a key moment in the development of my project as I was able to concisely pinpoint my exact vision, putting me in good stead to produce a project action plan and timeline. This allowed me to document a set of goals to accomplish during each week of the production, which was a really helpful method to ensure all the required tasks were completed before the overall deadline.
At this point, it was time to create a pitch to propose the concept of my production to my audience. I wanted to convey an extra level of creativity through this task to make my idea stand out, hence why I implemented the feature of a blue screen to interactively display my presentation. Originally, I found it difficult to find the confidence to speak to the camera naturally, however, after finalising my notes and some practice run throughs, I was able to enthusiastically and effectively deliver my pitch. This was a much-needed step out of my comfort zone; my improved presentation skills will be greatly beneficial during higher education and future career opportunities. This in combination with the interactive editing styles executed to depict moving timelines, videos, images and informative slides, culminated to produce a well-rounded pitch which I believe portrayed my project concept and the research surrounding it in an enthralling way.
It was now time to delve into the pre-production and planning, in preparation for the necessary film shoots to realise my creative vision. First of all, I carried out a location recce at my church band’s studio, Redeemer, Worthing. This allowed me to establish any risks, requirements and contact details needed for the day of filming, alongside any potential shots I could use.
Furthermore, I built a set of pre-visualised graphic plans to enable me to understand how I wanted the video effects and transitions to be perceived in post-production, which was really useful in planning the styles of shots I needed to film to make these intentions a reality.
Artistic drawings have never been a strong point of mine, so I did not feel as though a storyboard would have been the best way to exhibit my ideas, which is why I alternatively decided to create an extensive written shot list. This was a great help in developing the visuals of my production and meant that when it came to shooting and editing the music video, I knew what I wanted to achieve. However, I did find it challenging to stick to the shot list entirely, as there were extra shots and focal points that I spotted on the day of filming to benefit the interest of my target audience, which I then had to schedule in time for in post-production. Overall, this project has solidified the importance of planning before any film shoot; it greatly improved my level of organisation and understanding of the flow of the music video, resulting in a set of suitable, high-quality footage on reflection.
Filming was a great success, I was able to travel to a variety of attractive outdoor locations to film landscape scenery, enabling me to enhance my camera skills by experimenting with advanced techniques and conventions. Specifically, I was able to improve my skills in using manual focus by adjusting the focus ring on the camera lens to create dynamic arranged shots and focus pulls. Firstly, I was a little overwhelmed by all the different camera settings available to me, but after researching about the features online in my spare time and getting to grips with how to utilise them, I was able to advance my operating abilities to allow me to reach the high-levels I had set out to achieve during planning. Also, during my time spent filming the band at Redeemer’s studio, I developed a greater understanding of how to set up multiple camera angles through a vision mixer, this was a fantastic way to familiarise myself with additional practical equipment as well as widening my network of media contacts in readiness for future productions and higher education media courses. Additionally, I reflected on my practical skills gained, in visual and written detail in the practical skills section of my website, transparently displaying my technical improvements.
The post-production process was a little more time consuming, I spent over two weeks editing in Adobe Premiere Pro, to ensure my music video possessed the calming and reflective styles that I set out to accomplish after my target audience research results. This was made possible through the use of a variety of video effects, transitions and colour correction, which I once again reflected on thoroughly within my practical skills. As I mentioned in my pitch and pre-production, I aimed to include an ongoing theme of blue tones throughout the video to create peaceful visuals. This was very successful after utilising the combination of dragging adjustment layers across multiple clips to add colour correction, alongside the implementation of Lumetri Colour and RGB curves to make any fine adjustments to individual clips that had inconsistent levels of exposure, for instance. Additionally, the combination of push transitions and the crop video effect culminated to produce the trending editing convention of split screens. I followed my pre-visualised graphical elements plans in order to produce this; the technique provided an effective and creative method to blend the outdoor and studio footage.
One particular video effect which I found to be quite thought-provoking was the ‘Warp Stabilizer’, this was due to the fact that different settings had to be applied to individual clips that it was used on to ensure that the footage was smooth. For example, highly unstable video did not suit the ‘crop to stabilize’ default settings as this would cause the video to resize incorrectly. Consequently, ensuring the video effect had been programmed accordingly and that all the relevant frames had been analysed to produce the stable filming styles I aspired to reach in pre-production, turned into a long-drawn out process, although it did produce some stunning visuals, particularly for the handheld walking shots through the outdoor locations.
After rendering my final version of the music video in Adobe Premiere Pro, it was time to move over to Adobe After Effects to add more engaging video effects and the finishing touches to delight my upcoming and aspiring target audience. My inexperience in the use of the more innovative video effects made using this software initially problematic, leading me down the path of watching a selection of YouTube tutorials. This helped inspire me with a variety of video effects to include, for example, ‘CC Light Rays’ to create dynamic highlights and focal points, as well as ‘Motion Tile’ to build a mirrored zoom transition, which brilliantly complimented the overall style of my music video. Moreover, I experimented with the different tracking tools available to me; originally, I attempted to use camera tracking, however the shot I was editing had too much camera movement, resulting in an error message. Alternatively, I used motion tracking to follow a dog running along the beach in this particular shot, which produced fabulous results and allowed you to feel a sense of pace as the song reached its final crescendo.
On the whole, spending extensive time periods editing in the advanced software of Adobe Premiere Pro and After Effects has further enlightened me into the world of content creation, especially when accompanied with filming in the professional studio environment at Redeemer. I extended my creative and technical skills by ensuring quality in all of my camera work and editing every section thoroughly to ensure that the performance style music video flowed effectively and targeted my audience through the journey of the soothing and meaningful visuals.
Throughout the final major project, I feel I managed myself consistently by following the aforementioned project action plan and through staying resilient when facing challenging components of camera equipment, Adobe software and new theoretical processes to certify that I finished this creative media course with a final product that I am proud of. I stayed organised by constantly uploading my work to my website chronologically in the correctly labelled sections, which simplified the process of referencing back to previous work and carrying out ongoing reflection sessions.
Concluding my final major project and the course as a whole, I feel extremely grateful to have been able to partake in the plethora of units over the two years. It has been an excellent way for me to build confidence in not only my practical skills and theoretical knowledge, but also in communicating with a diverse group of people who share the same passion. Furthermore, my research and extended writing skills have improved tremendously as a result of the ongoing documentation on my websites. Moreover, the use of industry level editing software and professional sound and camera equipment, has allowed me to produce a multitude of unique creative outcomes, leaving me with an invaluable experience to take with me for the rest of my pathway into the world of creative media.
PRESENTATION
